
These white balance tips from Snap Happy Mom prove little things can make BIG differences in your photos. Meg has a knack for simplifying elements of photography for situations that "apply to mom." She's a believer that moms can (and should) take great pictures of their kids.
. . .
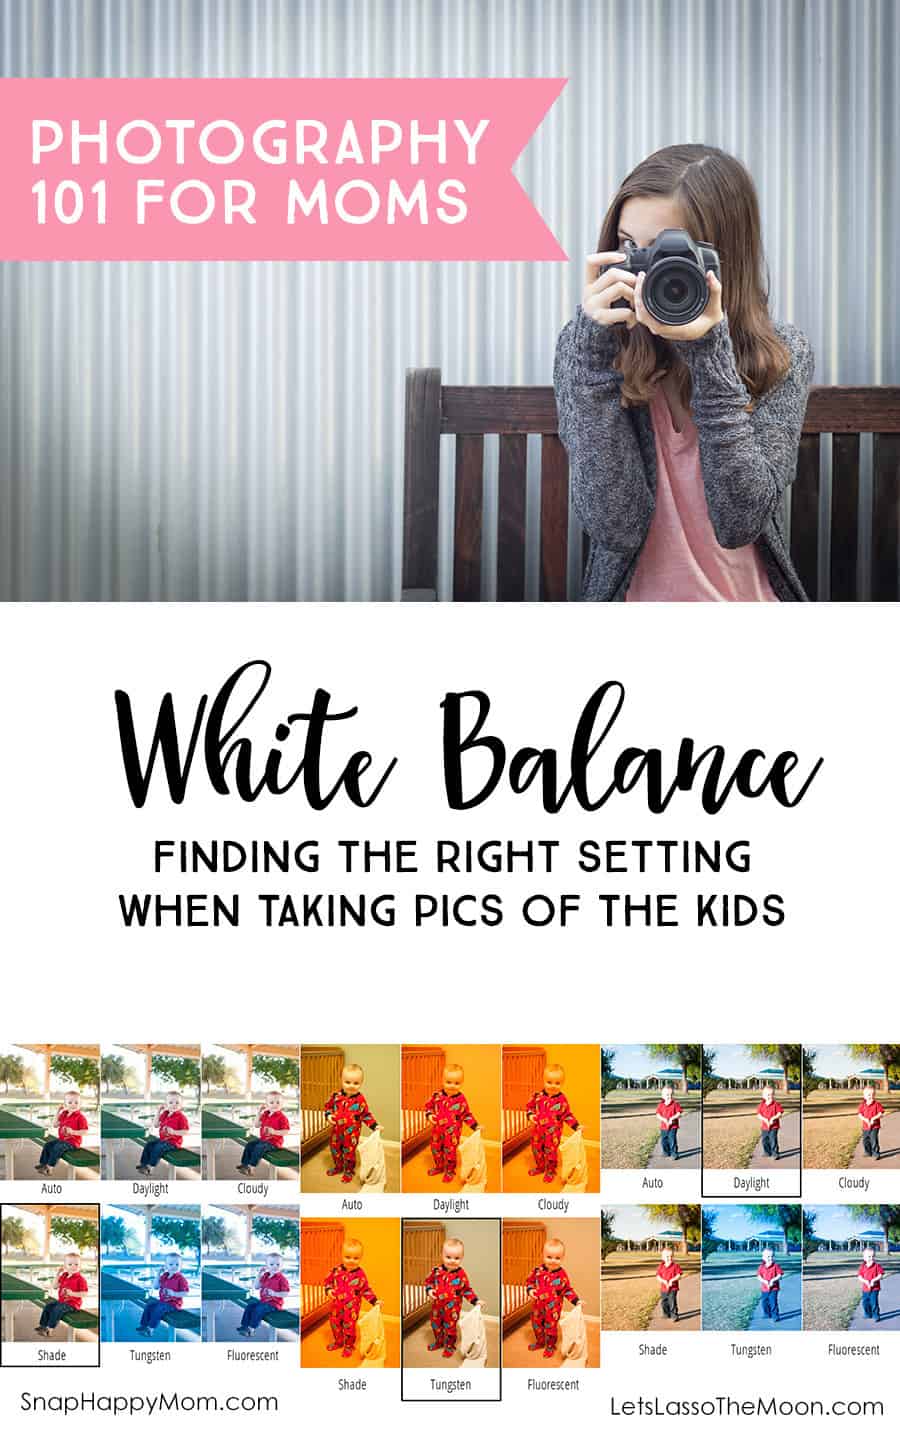
White balance is one of the little things that photography beginners don’t think about, but can make a HUGE difference in pictures!
Basically, white balance is how the camera decodes the color of the light around you, based on the goal of making white look purely white. All light has variations in temperature: sunlight is warm and yellow, but shade is cooler and has more blue tones. Your brain processes these changes all day long, making white always look right to your eye, but your camera just captures what it sees, light variations and all.
So in automatic mode, your camera tries to make sense of the light it “sees” and decode it correctly. But if you’ve ever seen your pictures turn blue or green or yellow, you know that sometimes the camera makes mistakes! And no one wants some weird alien skin tones to mess up a decent picture otherwise.
Now technically, you can adjust some white balance issues in post processing. But I'm a big believer in moms learning how to use their camera well in the first place, because most moms don't have time to edit their pictures. Taking control of white balance yourself is a big step in getting your pictures to look great, straight out of the camera.
Get your white balance right in camera!
How to Get Your White Balance RIGHT
Shooting with the correct white balance isn’t hard – it just requires you to get in the habit of thinking before you shoot. All you have to do is glance at the lighting around you and then put your camera in the right white balance mode. Here’s how.
You’ll need to look in your camera manual for how to change the white balance. It is almost always a round dial or menu with a series of pictures: a sun, a cloud, a light bulb, etc. Once you’ve found the dial, it’s a simple matter of rotating or toggling it to be on the correct mode for your situation. Just to be clear, it only affects pictures proactively – so changing this mode does not affect any pictures you already have on your memory card.
These pictures stand for what kind of light you’re shooting in:
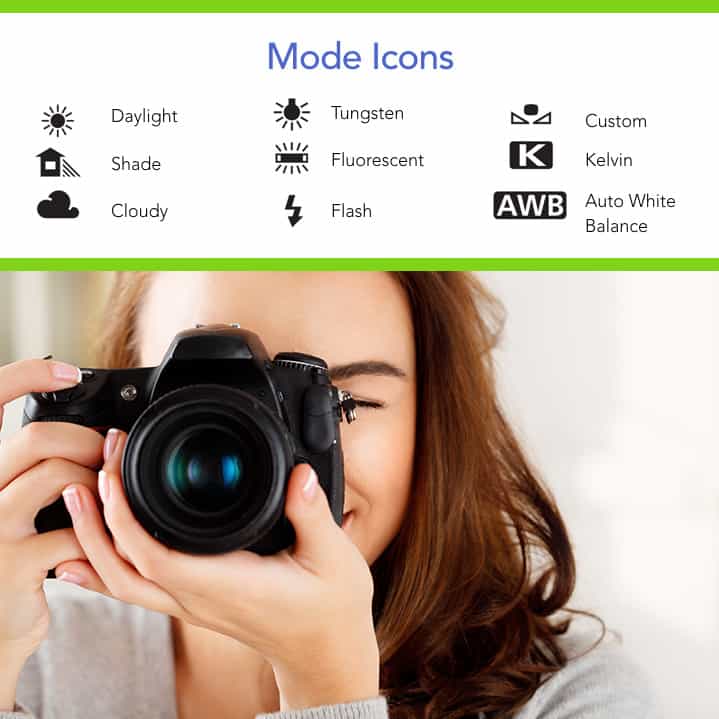
The important ones for moms are the first two columns, which are the lighting situations you will be using. Daylight is self-explanatory, and shade and cloudy are actually only slightly different from each other. Remember that most indoor lighting in your home will be tungsten/incandescent bulbs, while most industrial lighting in schools or other buildings is fluorescent. Ignore the custom and kelvin settings, but take note of auto white balance, usually abbreviated to AWB.
The modes are important because your camera is programmed to account for color variations in each setting, and adjust the color of your picture accordingly. So, a picture you take in the shade (which will look especially blue to your camera) will have a little more warmth and yellow added in. A picture taken in your home with incandescent/tungsten lighting often looks too orange, so your camera can account for that and make it look more natural.
Thankfully, you don’t need to understand all the technicalities of light to see that it helps your pictures: just put it on the right setting, and shoot away!
Let me walk you through which mode you should use.
Using the white balance modes will always provide better, more flattering color in your pictures. Remember, auto white balance can only do so much. The specific modes are where you colors will look the most natural. Sometimes the differences are subtle, but here are some examples where being in the right mode not only fixes weird color tints, it makes your pictures pop!

If you’re photographing your kids running around at the park, you’ll want to put your camera in the “daylight” white balance mode. Your camera will make your kids faces looks as sun-kissed as they really are. The differences here are subtle, but they are more apparent with lots of green grass.
If you've ever seen those strange blue tints like on the bottom row of the above picture, now you know why! That means your camera has been accidentally set in an indoor lighting mode, which makes your outdoor pictures look kind of awful, right? Don't worry, it's an easy to fix to just switch your mode.
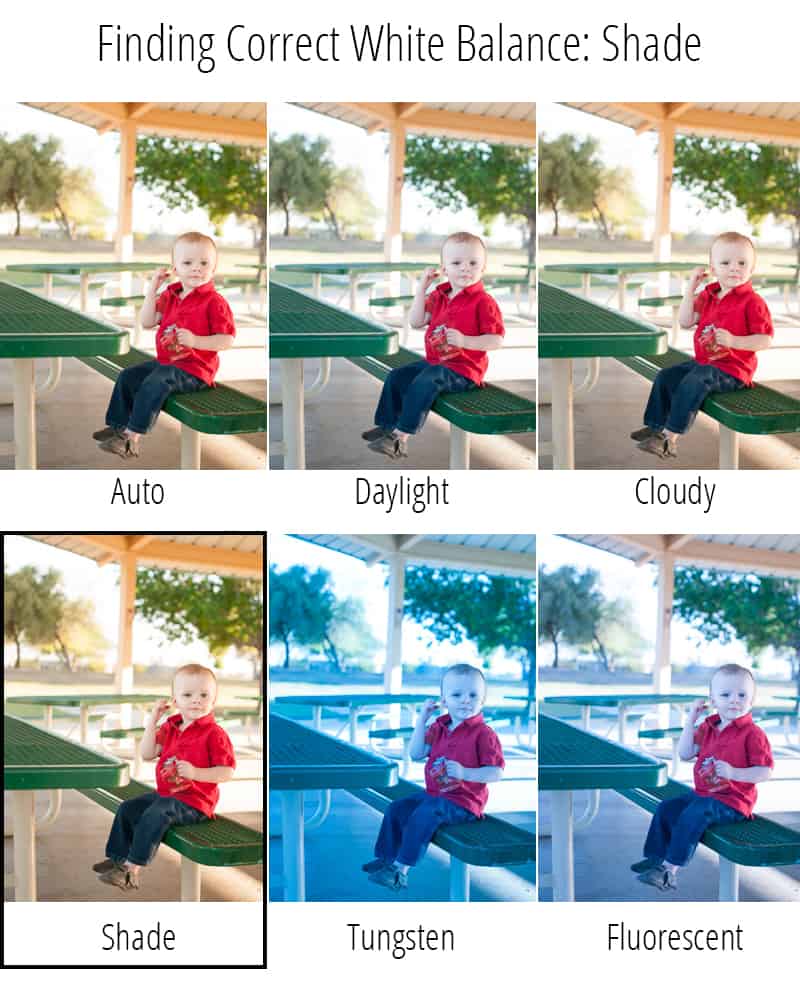
When your kids come over to the covered picnic area to eat, the light has changed: so now you want to be in the “shade” white balance mode. In this mode your camera will account for the difference in light, and warm up that slightly blueish light at your picnic table. The difference between daylight and cloudy and shade is slight - but you can see that they get progressively warmer and warmer. Using the right mode will get you the most true-to-life colors, but of course, there's always room for personal opinion as to what looks best.
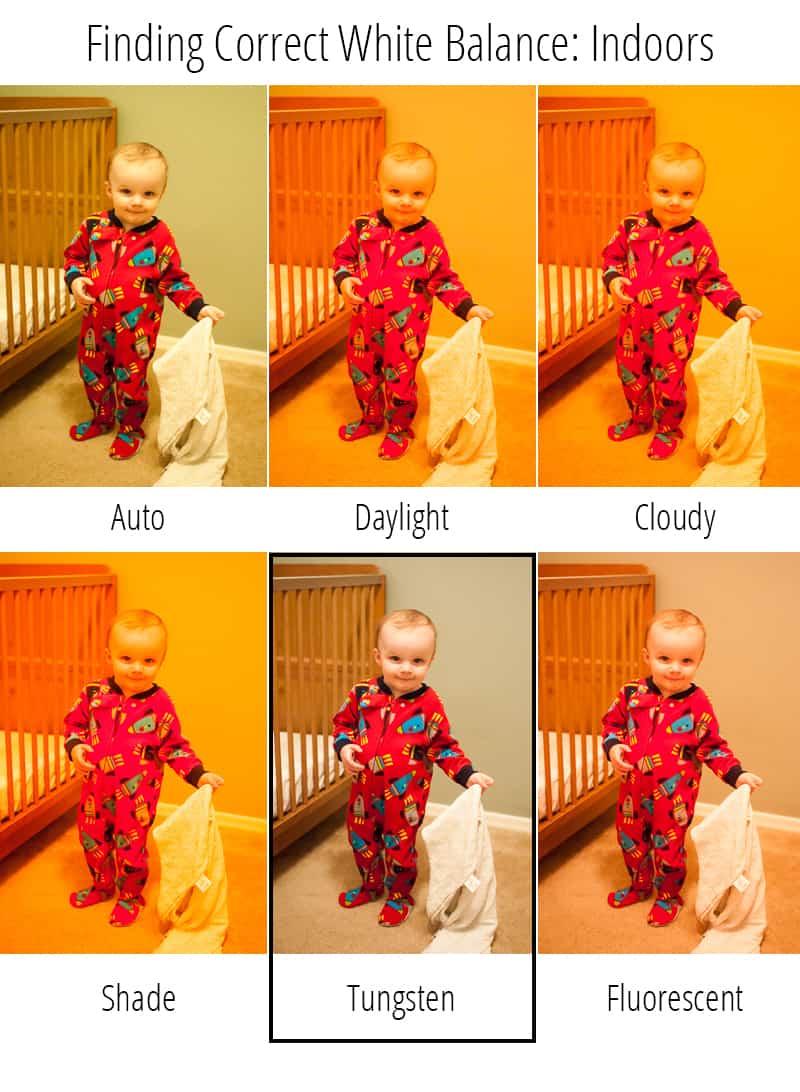
This is what those same modes look like indoors. Now here’s the thing: if you forget to change the mode, your camera will OVERcompensate its color adjustments. So if your kids come inside that night and you try to take a picture of their cute pajamas, you are now in incandescent lighting.
If you haven’t changed your camera from earlier in the day, you’re going to end up with those crazy orange or yellow tints you see above, because your camera is amplifying the already warm light to be even warmer. Instead, that tungsten mode will neutralize that orange color and make it look as natural to your camera as you see it.
Bottom Line: Always check your white balance mode!
If you ever see unnatural colors – green, blue, yellow, or orange tints - immediately check the white balance mode. It will probably be in the wrong mode for your situation. It might just be in auto white balance, and the camera made a bad decision what the lighting should look like. Either way, switching it to the right mode, based on where you are shooting, should fix the problem immediately for all future pictures.
After looking at these, you may be thinking that Auto White Balance looks pretty close to the custom white balance mode. That's a point for your camera doing its job! Auto white balance is where the camera is monitoring the light and deciding how to change it, and lots of people use this with decent results in simple lighting situations. However, auto white balance does struggle in mixed lighting situations (like when there is window light and the lights are on as well) and especially with fluorescent lighting.
So, if you’re overwhelmed you can stay in auto white balance, but you also know how to fix the situation as your eye gets better. Taking control of that white balance yourself will always get you beautiful and natural color.
If you thought this tip was helpful, you’ll love the other lessons in my photography course: A Mom’s Guide To Better Photos. This class features mom-specific tips for any type of camera – from smartphone to a DSLR.
The course is intended for moms that want to take better pictures of their kids, but don't have time to learn the intricacies of photography. If you're overwhelmed or frustrated with your camera, let me teach you some quick things that will improve your pictures immediately. You can feel confident with a camera in just a few hours!
Get more information about A Mom's Guide To Better Photos here:

![]()
 Snap Happy Mom is dedicated to helping moms (and Dads!) learn how to take better pictures of their families. Meg wants you to have pictures that matter to them, and that capture those precious moments of parenting and childhood. No matter what kind of camera you have or how experienced you are, she can help you feel more comfortable behind that camera.
Find Meg online here →
Blog | Facebook | Instagram | Pinterest | Twitter
![]()
You Might Also Like
Check out these other great posts from Snap Happy Mom:
- AWESOME CHILDREN’S PHOTOGRAPHY TIPS
- DSLR CAMERA GUIDE FOR MOMS
- TIPS TO MAKE FAMILY PICTURE DAY A GOOD EXPERIENCE